Dear NSPanel Pro Users,
Thank you for your continued attention and support! We are pleased to announce that the NSPanel Pro V4.3.0 firmware has been officially released. This update focuses on enhancing NSPanel Pro’s integration with mainstream open ecosystems, upgrading the thermostat capabilities, and bringing a variety of new features that improve usability and customization.
New Features Overview
1.Core Features
-
Matter Bridge Chapter 3: NSPanel Pro can now act as a Matter Bridge, supporting the connection of non-Matter devices from Home Assistant to third-party Matter ecosystems, enabling cross-platform control.
-
Central Heating System:
We have significantly upgraded the thermostat functionality. You can now centrally view and manage multiple heating zones through NSPanel Pro’s dedicated Central Heating screen, achieving intelligent whole-house heating control.
2. Additional Features
-
Expose NSPanel Pro to Home Assistant via MQTT: NSPanel Pro can now expose its own capabilities as entities to Home Assistant through a configured MQTT broker. This includes:
- Speaker: NSPanel’s speaker is now exposed in Home Assistant, enabling startup volume adjustments.
- Screen & Sensors: Control screen wake/sleep, adjust brightness; read ambient light sensor data.
- Smart Security: Arm/disarm remotely.
- Basic Status: Online status, IP address, and other information.
-
Interaction & Notification Optimization**:
- Device card interaction optimized: Tap the icon to control on/off; tap elsewhere on the card to enter details.
- Notifications support custom ringtones and message content
- Support for disabling system startup sound
-
Zigbee Mode Switch Optimization: Switching between Coordinator and Router modes no longer requires resetting the device.
-
Thermostat Function Enhancement
- TRV devices are supported in the thermostat split-screen for display and control
- Temperature adjustment precision supports 0.1°C increments
-
New Device Support: SONOFF S61s, S41s smart plugs and MINI-ZB2GS stepper controller.
3. Bugfix
Several known issues have been fixed, improving system stability.
This release implements the features outlined in our product roadmap. Please refer to NSPanel Pro Roadmap and Co-Created Future - NSPanel Pro - eWeLink Forum for more details.
Detailed Operation Tutorials
To help you quickly get started with the new features, we’ve provided detailed step-by-step guides for each major feature, including both eWeLink App and NSPanel Pro screen operations. Please ensure your NSPanel Pro has been upgraded to v4.3.0
Note:
-
v4.3.0 is a beta release for selected devices. If you would like to experience the latest features, please join through the NSPanel Pro v4.xx Beta Test Application Tool.
-
Please ensure your App version is
v5.22.1or above.
The current eWeLink Appv5.22.1was submitted to the Google Play Store for review on January 12th and is expected to support updates in about a week.
Tutorial 1: Bridging Home Assistant Devices to Matter via NSPanel Pro
Prerequisite: NSPanel Pro needs to be synced to a Matter ecosystem.
Please refer to NSPanel Pro v4.1.0 Release: New Features & Enhancements - NSPanel Pro - eWeLink Forum for more details.
App Operation Steps
-
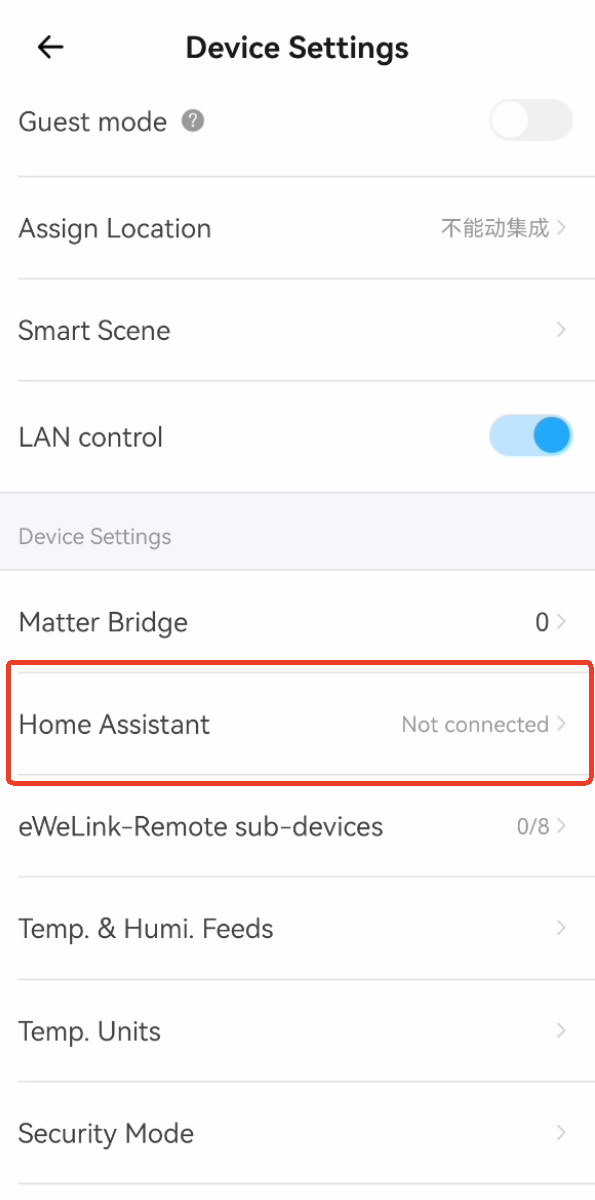
Accessing the Home Assistant feature:
NSPanel Pro > Settings > Home Assistantto enter the feature.
-
Configure and Connect to Home Assistant:
Search for Home Assistant on the local network (or click “Manual Configuration” to enter the Home Assistant IP) > Enter the port number > Click “Configure” > Redirect and log in to your Home Assistant account.After successful login, devices and entities from your Home Assistant platform will be displayed in the eWeLink App.
-
Bridge Home Assistant Devices to Matter
Click Edit > Select devices/entities (multiple selection supported) > Save. After successful sync, devices will be synced by default to the Matter ecosystem that NSPanel Pro has already joined. -
View Sync Status and Control Devices:
Once the sync is successful, you can view the sync status in the App and control devices via the Matter platform.
Tutorial 2: Using the Central Heating System
App Operation Steps:
-
Enable the “Central Heating System”:
Click the NSPanel Pro device card to enter the details page.
NSPanel Pro > Details Page > Screens > Click the icon in the top right corner > Add "Central Heating" to the Displayed section > Save.
Supports reordering the “Central Heating” screen.
After saving successfully, you need to go to the NSPanel Pro device to view the Central Heating screen and configure/use it.


NSPanel Pro Screen Operation Steps:
-
Enable the “Central Heating System” (If you have already enabled it via the eWeLink App, you can skip this step):
Pull down the menu >Settings>Thermostats>Central Heating Button, toggle the “Central Heating Button” setting to enable, then go to view the Central Heating screen for configuration and use.
-
Initial Configuration:
Central Heating screen > Add. Configure according to the on-screen content:- Name: Set a name.
- Temp unit: Set the temperature unit to display.
- Boiler actuator: Select the device that controls the boiler to start/stop heating (It needs to be a switch device).
- Rooms: Select the heating zones to manage, and for each zone, choose the temperature source device and the device that controls the zone’s radiator switch.
-
Subsequent Use:
a. Long press the thermostat card to enter the thermostat UI control interface.
b. Set the temperature, switch operating modes,etc.


Tutorial 3: Exposing NSPanel Pro to Home Assistant via MQTT
Note: If you have already configured an MQTT Broker via the eWeLink App before this version, after upgrading to v4.3.0, NSPanel Pro will automatically connect to the configured Home Assistant.
App Operation Steps:
Please refer to: https://forum.ewelink.cc/t/nspanel-pro-v4-1-0-release-new-features-enhancements/206443
-
In the App, go to
NSPanel Pro > Device Settings > Home Assistant > Click Get Started. After completing the MQTT Broker configuration,NSPanel Pro will automatically connect to the Home Assistant platform previously configured. -
Once connected, you can view and control NSPanel Pro in Home Assistant. Supported functions include:
- Speaker: Adjust startup volume.
- Screen & Sensors: Control screen wake/sleep, adjust brightness; read ambient light sensor data.
- Smart Security: Arm/disarm remotely.
- Basic Status: Online status, IP address, and other information.
NSPanel Pro Screen Operation Steps:
No operation required.
Tutorial 4: Setting Custom Notifications
When Smart Security or Smart Scenes are triggered, notifications on the NSPanel Pro screen support configuration of custom ringtones and message text.
1. Smart Security
App Operation Steps:
a. Click the NSPanel Pro device card to enter the details page. NSPanel Pro > Details Page > Gateway > Smart Security.

b. Click the security name to enter the configuration page. Alarm > Settings > Alarm Beeps > Choose > Custom Ringtone > Upload.


Redirect to the system folder, select the audio file. After upload completes, choose the corresponding custom ringtone, then continue completing other configuration for Smart Security.
2. Smart Scenes
Supports custom ringtones and custom message text as an execution action for Smart Scenes, triggering notifications on the NSPanel Pro screen.
App Operation Steps:
Prerequisite: NSPanel Pro needs to be selected as an execution action for the Smart Scene.
a. In the Smart Scene configuration page, select NSPanel Pro as the scene execution action: Then > Smart Device > NSPanel Pro.


b. Configure Custom Ringtone: Alarm Beeps > Choose.

If pre-uploaded custom ringtones already exist, you can directly select one, or click Custom Ringtone > Upload.
c. Configure Custom Notification Message: Set the Pop-up Alert Button to enabled, Alert Message > Custom > Enter the alert message text you want displayed on the NSPanel Pro screen, then save.
Continue completing other configurations for the Smart Scene, then click Save Smart Scene.
d. Select the custom ringtone and edit the alert message.

e. Save the scene.
Tutorial 5: Custom Ringtone Management
You can upload custom ringtones for configuration in Smart Security and Smart Scenes, and manage the uploaded custom ringtones.
App Operation Steps:
a. Go to NSPanel Pro > Device Settings > Ringtone.
b. Click Upload to upload a new ringtone file.
c. Click on an uploaded ringtone in the list to manage it, such as changing the ringtone name or deleting the ringtone.


Tutorial 6: Device Card Interaction in NSPanel Pro Device Screen
In this version, we have optimized the device card interaction within the device screen.
NSPanel Pro Screen Operation Steps:
- Click the icon on the device card to control the device’s on/off state.
- Single-channel device: Click the device icon to control the single-channel switch.
- Multi-channel device: Click the device icon to control all channels of the device, turning all on or all off.
- Click the blank area of the device card to enter the device details page and control functions other than the on/off switch.

Tutorial 7: Others
NSPanel Pro Screen Operation Steps:
a. Disable System Startup Sound: Top drop-down menu -> Settings -> Volume -> Start Sound to Off/Disabled.
Bug Fixes & Gratitude
In the v4.3.0 release, we’ve fixed several issues reported in the community forums. Special thanks to users who provided valuable feedback on our community forum. Their reports helped us quickly identify and resolve these issues. Below are some of the fixed bugs with their respective feedback links:
- Improved device tiles with clearer status indicators and more intuitive tap interactions.
- Screen sleep/wake and screen saver settings now work consistently across all apps on NSPanel Pro.
- Added an option to mute the startup sound.
- Improved TRV support on NSPanel Pro, including:
- Display and control in the thermostat screen view.
- Enhanced tile information for current status and target temperature.
- Reboots are no longer necessary for smoothly switching between Zigbee Hub Mode and Zigbee Router Mode.
- Temperature adjustments for Thermostat are now more precise when configured in the eWeLink App.
We sincerely thank all users who reported issues! If you encounter any new problems after upgrading, please feel free to post in the forum or contact our support team. Your feedback is the driving force behind our progress.
Conclusion
The v4.3.0 version further solidifies NSPanel Pro’s position as the core of smart home control by introducing the Central Heating system and enhanced ecosystem integration capabilities. We continue to optimize the basic experience, fix known issues, and strive to provide you with a more reliable and feature-rich product.
If you encounter any issues during the upgrade or usage process, please feel free to discuss them with us in the forum. Your feedback will help us continuously improve NSPanel Pro.
Thank you for your ongoing support.
The NSPanel Pro Team


