Hi, we have prepared the Wi-Fi manager image. Please download it from Google Drive: https://drive.google.com/file/d/1VcVGxjcE7vLNJKiCsFnCfKy3BGHF8oVi/view?usp=sharing
Here is how to use it:
-
Flash the iHost_Wi-Fi_Manager image onto your TF card, just like you did many times before.
-
Insert the TF card into your computer again (your computer, not iHost). The filesystem on the TF card should be mounted to your computer, and you will see a disk drive called
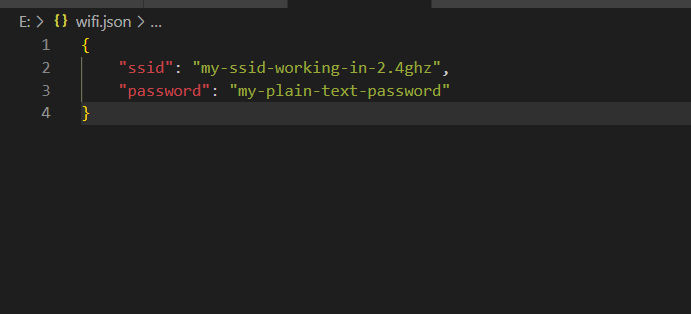
overlay. Open the file namedwifiwith file extension.jsonunderoverlay, fill outssidandpassword. Note, the specified ssid should work in 2.4GHz band. -
Insert the TF card into iHost, and boot iHost from TF card. You should see the
Breathing Bluelighting effect of LED side strip. -
Wait for a moment (should less than 1 minute), the LED side strip should turn into
Breathing Yellow, which means the Wi-Fi manager program is trying to connect iHost to your Wi-Fi router with the SSID and password you specified in step 2.If you see
Breathing Redin this stage, it means iHost can’t connect to your Wi-Fi router. Please double check the SSID and password, and make sure iHost is not far away from your Wi-Fi router.If you see
Rapid Flashing Red, it means there is something wrong writing Wi-Fi info into eWeLink CUBE OS on the internal eMMC.If you see
Solid Red, it means the version of eWeLink CUBE OS on the internal eMMC is too old. The version of eWeLink CUBE OS should be V2.2.0 at least. -
Wait until the LED side strip turns into
Solid Greenwhich means the whole process has been completed and was successful. -
You can then power cycle iHost, and boot it from internal eMMC. Wait for several minutes, the eWeLink CUBE OS should finish starup and connect to WLAN.
If you met any issue using this Wi-Fi manager image, you can insert the TF card back to your computer, and provide us the .logs directory (maybe hidden on Windows) under overlay disk drive.